20231004

Ny Blogg

Hej alla underbara följare och läsare och följare denna härlig höst dag med solen som värmer lite i höstkylan. Jag har startat en ny blogg på blogger som heter Lias Creative Place

Artist Trading Card for a FB swap group

Idag tänkte jag visa 5 st ATC som har skapat för FB ATC swap gruppen. Temat för korten var tid och jag visste ganska snabbt hur jag ville skapa dessa. Jag började med att ”kreativt” återvinna en box från tvättsvampar från apoteket. Jag öppnade upp den så den blev en ”längre bit och sedan skar jag med den till fem 2 1/2” x 3 1/2” delar. Jag målade dem med svart gesso och när de torkat använde jag en klockstencil och koppar paste. Sedan bigade jag ut Tim Holtz Movers & Shapers Mini Vintage Alarm Clock från bitar av en flyttkartong. Jag vevade även ut klockan från svart cardstock. Jag ville göra shakers av klockan så jag klippte försiktigt bort visarna från kartongen men sparade dem på den svarta. Sedan klippte jag bort vissa delar på tre av klockorna för att de skulle bli lite olika.  


Today I want to show you the ATC´s I made for the FB ATC swap group. The theme for the cards were time and I knew pretty much right away how I was going to create my five card. I started by upcycling a box for washing sponges from the pharmacy, by opening it up and cutting it down to five 2 1/2" x 3 1/2" pieces. I painted the cards with black gesso and when the were dry I used a clock stencil together with copper paste. Then I die cut Tim Holtz Movers & Shapers Mini Vintage Alarm Clock from an recycled storage box. I also die cut the clock from black card stock. I wanted to make shakers of the clock so I carefully cut of the clock hands from de box dies but I kept them on the black card stock. Then I cut off some of the clocks pats on three of the clocks so they would look a little bit different.


Jag målade den svarta cardstocken med silver färg men jag sparade visarna svarta. Sedan valde jag ut fem olika citat om tid och dekorerande klockorna utifrån citaten.

I painted the black cardstock with silver paint but I kept the clock hands black. The I selected and created five different Quotes about time and decorated the clocks based on the quotes.


På detta kort klippte jag bort alla extra delarna och sparade bara en cirkel. Som dekoration hittade jag en bild på internet som jag förminskade och skrev ut för klippa ut. Jag färglade med akvarellfärg och limma på plats.

On this card I cut off all the extra parts and just saved the circle. As a decoration I found a picture online that I reduced and printed to cut out. I colored it with some watercolor and glued it in place.


På detta kort klippte jag om ena benet till vrid delen på en klocka. Jag valde lite att rita ett förstoringsglas som jag sedan klippte ut och färglade med silver färg. Jag skapade två anteckningsböcker som jag grungeade upp för att de skulle se lite slitna ut. Jag avlutade med att slarv skriva i den öppna boken.

On this card I cut down one of the clocks feet into the part that wind up the clock. I chose to draw a magnifying glass, which I the cut out and colored with silver watercolor. I created two mini notebooks that I grunged up to make them look a bit worn out. I finished it off by doodeling in the open book.


Den här klockan fick behålla ding ding del som istället får agera vrid mojängen. Jag sökte reda på en bild på Pericles som myntade citatet och sedan förminska jag den och skrev ut, för att sedan klippa ut bilden.

This clock got to keep the ding ding part but I turned it so it became the wind up part. I looked online for a picture of Pericles, he was the one coined the quote then I reduced it, printed it and cut the picture out.


Båda dessa kort har hela klockan på sig och samma dekorationer då de båda har citat kopplat till pengar. Jag sökte efter gällande svenska sedlar på nätet och sparade ner för att sedan förminska dem markant och klippa ut efter utskrift.

Both of these cards have the uncut clock on them and the same decorations as they both have quotes linked to money. I searched for valid Swedish banknotes online and saved them, then I reduced them significantly and cut them out after printing.

Jag hoppas ni kan inspireras och tycker om mina ATC och att ni har en underbar dag 🌸

I hope you can be inspired and enjoy my ATC and that you have a wonderful day 🌸


20230812

Artist Trading Coins

Hej alla underbara pysslare, idag tänkte jag visa några ATCoins som jag har skapat för en swap. Jag är med en ATC grupp på Facebook som har teman på swappar varje månad men man skickar var tredje månad. Man ska skapa fem ATC och/eller fem ATCoins och man kan även vara med på en bonus och skapa fem ATC och/eller ATCoins. Alla har olika teman och alla månader ligger inne så man skapa i förväg om man har tid. Jag har skapat en egen etikett frö denna grupp: FB Swap Group.


Hey to all fellow crafters, today I thought I'd show you some ATCoins I've created for a swap. I'm in an ATC group on Facebook that has themed swaps every month but we are to send every three months. You must create five ATC and/or five ATCoins and you can also participate in a bonus and create five ATC and/or ATCoins. All have different themes and every months themes are published, so you can create in advance if you have time. I've created it's own label: FB Swap Group.
 

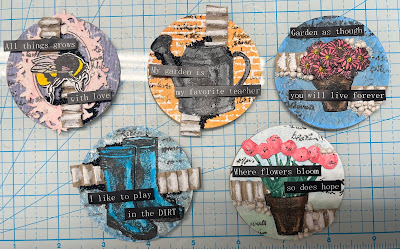
Jag skapade fem ATCoins utifrån temat ”Trädgård” som dock är från Mars men det var få som deltog så de ville gärna få in jan-mars nu i september. Jag valde att använda stämplar som jag köpte på Temu i början på sommaren. De ingår dies till stämplarna men jag valde att klippa förhand då jag hade lite 3D planer för dessa ATCoins. Utöver temat så har jag som en rödtråd använt samma textstämpel i allas bakgrunder och alla har kartong bitar som dekoration. Jag klippte av en bit kartong från en jag sparat för återvinning/upcycling, jag klippte ner kartong biten i mindre längder sedan drog jag bort ena sidans papper för att synliggöra strukturen. Tillsist torrborstade jag strukturen med vit akrylfärg.

I created these ATCoins based on the theme "Garden", which is from Mars, but there were so few participants so they wished to get January-March in now in September as well. I chose to use stamps that I bought at Temu at the beginning of the summer. They include dies for the stamps but I chose to cut by hand as I had some 3D plans for these ATCoins. In addition to the theme, as a common thread I have used the same text stamp in everyone's backgrounds and everyone has cardboard pieces as decoration. I cut a piece of cardboard from a box I saved for recycling/upcycling. I cut the cardboard piece into smaller strips, then I pulled of the paper on one side to reveal the structure. Finally, I drybrushed the structure with white acrylic paint. 

Här kommer de:

Here they are:

Jag började med att veva ut 10 st 2 1/2” cirklar från ljusbrunt cardstock samt fem st i akvarellpapper. Jag limmade ihop de bruna cirklarna en och en så det blev fem sedan skapade jag själva ATCoinen på akvarellpappret som jag limmade på de bruna sedan.

I started by die cutting 10 pcs of 2 1/2” circles from light brown cardstock and five from watercolor paper. I glued two light brown circles together so I got five, and then I created the ATCoins on the watercolor paper circles and glued them on once they were done to the light brown double circles.

Låt oss titta lite närmare och få lite mer information för var och ett av ATCoinsen:

Lets take a closer look and get a little more information about each one of the ATCoins:

Först ut är ”Boots on”

First one out is ”Boots on”


På detta ATCoin började jag med att lägga på ”Liquitex Resin Sand” och när den hade torkat målade jag den med blå akvarellfärg. Sedan stämplade jag textstämpeln med svart Versafine. Jag stämplade upp stövlarna två gånger så jag kunde klippa ut en extra, den främre. Sedan färglade stövlarna med blå akvarellfärg och den extra främre stöveln fäste jag över den andra med 3D kuddar för att skapa 3D effekt. Jag limmade kartongremsorna på var sida om stövel paret sedan valde jag ett citat som jag tyckte passade. Jag skrev citatet på min dator och skrev ut och klippte det så det fick plats på mitt ATCoin. Till sist limmade jag på lite olika ställen och strödde sedan ut svart ”kaviar” över alla ställen.

On this ATCoin I started by adding on ”Liquitex Resin Sand and when it had dried I painted it with blue watercolor paint. Then I stamped the text stamp with black Versafine. I stamped the boots twice so I could cut out an extra one, the front one. Then I colored the boots with blue watercolor paint and the extra front boot I attached over the other with 3D pads to create a 3D effect. I glued the cardboard strips on each side of the pair of boots and then I chose a quote that I thought fit. I typed the quote on my computer and printed and cut it to fit the ATCoin. To finish it up I put some glue on different spots and the I sprinkled som black “caviar” over this spots.


Mitt andra ATCoin vevade jag ut en cirkel från ett lila mönsterpapper som bakgrund. Sedan stämplade jag textande svart Versafine direkt på pappret. Jag valde en chipboard ram från Wishynanka som jag målade rosa med akrylfärg. Jag stämplade upp biet och klippte ut det och fäste det med 3D kuddar då ramen är under den till viss del. Sedan limmade kartongremsorna över och under biet sedan klippte jag och limmade fast ett citat. Som avslutning strödde jag återigen ut svart ”kaviar” på olika ställen.

For my second ATCoin, I die cut a circle from a purple patterned paper as a background. Then I stamped the text stamp with black Versafine directly onto the paper. I chose a chipboard frame from Wishynanka which I painted pink with acrylic paint. I stamped the bee and cut it out and attached it with 3D pads as the frame is under it to some extent. Then I glued the cardboard strips over and under the bee and I cut and glued a quote to finish it if I glued some black “caviar” in different spots.


För mitt tredje ATCoin valde jag att embossa en “tegelfog” stämpel med vitt embossingpulver och sedan målade jag med orange akvarellfärg. Jag använde bollverktyg på vattenkannan och fäste den sedan med 3D kuddar i mitten och lim på  sidokanterna. Jag limmade fast kartongremsorna och citatet och sedan strödde jag på svarta ”kaviaren”.

For my third ATCoin I chose to white emboss a stamp brick wall stamp and then I painted all over the coin with orange watercolor paint. I used a ball toll on the water can and secured to the coin with 3D foam in the middle and liquid glue on the sides. I glued on the cardboard strips, a quote and the black “caviar”.


Mitt fjärde ATCoin målade jag med blå akvarellfärg och sedan stämplade jag med text stämpel med svart bläck på lite olika ställen. Jag stämplade blommorna två gånger då jag ville få lite extra 3D effekt. Jag färglade blommorna med rosa och gul akvarellfärg sedan klippte ut två blommor från dubbletten. Jag använde bollverktyget och fäste buketten med 3D kuddar under blommorna och de två extra limmade jag inne i buketten. Jag använde även bollverktyget på krukan som fick lite 3D kuddar i mitten. Återigen limmade jag pappersremsorna och ett citat. Men på detta coin strödde jag istället ut art stones, både medium och mini, på lite olika platser.

My fourth ATCoin I painted with blue watercolor paint and then I stamped a text stamp with some black ink on different spots. I stamped the flowers twice since I wanted to create some extra 3D effects. I colored the flowers with pink and yellow watercolor, and then I cut out the bouquet and two extra flower from the duplicate. I used my ball toll once again and the I glued the bouquet with mini 3D foam pads under the flowers and I glued the two extra on top of the bouquet. I also used the ball toll on the pit which got glued in with some 3D foam pads in the center. But on this coin I sprinkled some art stones, both medium and small, in different places.


Mitt femte och sista ATCoin målade jag med ljusblå akvarellfärg på övre delen och längst ner målade jag med ljusgrön. Sedan stämplade jag mitt textstämpel med svart bläck på lite olika platser. Jag färglade blommorna med rosa akvarellfärg och grönt på stjälkarna, krukan målade jag med olika brun. Sedan använde jag boll verktyget på blommorna och krukan och fäste krukan med 3D kuddar i mitten, stjälkarna med flytande lim och blommorna med 3D kuddar. Jag limmade på kartongremsorna och citatet sedan strödde jag på med art stones, medium och small.

I colored my fifth and last ATCoin with light blue watercolor paint on the upper part and at the bottom I painted with light green. Then I stamped my text stamp with black ink in different places. I colored the flowers with pink watercolor paint and green on the stems, I painted the pot with different browns. Then I used the ball tool on the flowers and the pot and attached the pot with 3D pads in the middle, the stems with liquid glue and the flowers with 3D pads. I glued on the cardboard strips and the quote then I sprinkled some art stones, medium and small.

Jag hoppas ni har en bra dag i sensommaren och kanske hittar lite inspiration här idag. Kram Lillian

I hope you have a nice end of the-summer day and maybe find some inspiration here today. Hugs Lillian

20230725

A pep card for a friend

En av mina bästa vänner har det tufft just nu och jag ville skapa ett kort för att visa att jag finns här.

Min pyssel kompis bästa Helena ville testa att göra ett ”triple heart easel card” för första gången. Vi skapade varsitt kort och jag visade henne under skapandet de olika momenten för att kortet skulle fungera. Sedan var dags för det roliga, dekoreringen 🌸. Man får tänka lite på hur man placerar dekorationerna då hjärtana står framför varandra och därmed täcker varan till viss del.

One of my very best friends is having a tuff time right now so I wanted to make her a card to show I’m here for her. 

My crafty friend the best Helena wanted to try out an make a triple heart easel card for the first time. We made one card each and during the creating I showed her different steps until the card base was completed. The it was time for fun part, decorating 🌸.  With this card you have to mind the decorations since the hearts cover one another a bit when the card is in standing position.

Men nu lite bilder på kortet jag skapade:

But now it’s time for some pictures of my finished card:


Det här är fram sidan av kortet innan det öppnas. Jag använde ett hjärt die sett med fusk stygn både på basen och mönsterpappret. Framsidan är det största hjärtat och jag vevade ut ett extra hjärta i samma storlek som basens största i samma bruna papper. Jag gjorde en extra då jag vill placera en spets runt kanten. Sedan vevade jag ett mindre hjärta i svart cardstock och en lite mindre ändå i mönsterpapper. 

Jag gjorde små blommor från ett kaffe filter som jag färgade med rosa akrylfärg. Jag använde en av mina skulpteringsverktyg på blombladen innan jag kombinerade fyra blommor tillsammans. Jag använde Nuvo crystal drops i mitten på blommorna. Tack diesen är från min stash men jag vet inte vilket märke. Under själva Easel kortet har jag limmat ett vanligt hjärt kort som jag har skrivit min hälsning i. Dock är det många lager med papper så jag valde att skapa en banner med hennes namn som fäste på två mini klädnypor som sedan håller ihop kortet. För att skapa bannern använda jag den ena av EK Success mini punch : pennant set.

This is the front of the card when it hasn’t been opened yet. I used a nested heart set with faux stitching as my base and patted paper. The front of the card is the biggest heart and die cut two in the brown paper. On the second one I placed a lace round the edge before I put on the base heart. Then I die cut two hearts, one a little smaller in black card stock and one smaller then that in patterned paper. 

I made the small flowers from a coffee filter that I dyed  with pink acrylic paint. I used one off my dotting tools on the flower petals and I combined four flowers and then I used Nuvo crystal drops in the center of the flowers. The thanks die cut is made with die from my stash that I don’t know the brand for. This easel card has a “regular card” in the bottom where I wrote my text for her. All these layers of paper makes it hard for the card to stay closed. As a solution I created a banner using my EK Success mini punch: pennant set. I tied the strings from the banner to mini cloth pins to hold the card together.


Stämpeln på hjärtat i mitten är stämpel från Lili of the Valley. Jag använde samma blommor inne kortet som de som är på framsidan men som när det är uppställt är längsbak. På det främre hjärtat jag som sagt använt samma blommor som innan. Jag dekorerade även hjärtat med en groda som bästa Helena hade med sig hem till mig, det gröna löven hör ihop med grod dien. Johanna älskar grodor så jag hoppas hon tycker om kortet. Det minsta hjärtat som agerar stop för det främsta hjärtat har också en stämpel från Lili of the Valley.

The stamp on the middle heart is A stamp from Lili of the Valley. I used the same flowers as the top heart, now the heart in the back, had inside the card. On the front heart I have more of the flowers and a fun frog. The die is one I borrowed from my friend for. The green leaves are from the frog set. Johanna loves frogs so I hope she likes this card. The smallest heart also has a stamp from Lili of the Valley.


Jag hoppas ni kan få lite inspiration från kortet och att ni har en underbar sommar. Hej för den här gången 🌸

I hopp you can find some inspiration in this card and that you have a wonder summer. Bye for now 🌸

20230503

Never the wrong time to craft Christmas cards - right?

Hej alla härliga läsare! 
Just nu är jag hemma med Lumbago Ischias och därmed otrolig smärta i rygg och vänster ben. Är inne på sjätte veckan hemma och nu har även höger ben börjat bråka. Men humöret är på topp och jag har all tid i världen att titta på inspiration och annat man kan göra i liggande position. Men idag tänkte jag visa ett julkort som jag gjorde... ja nu är det någon månad sedan men jaja så kan vara.

Jag såg ett jätte fint julkort och vill testa att göra ett jag med.

Hello all lovely blog readers!

Right now I’m on sick leave with Lumbago sciatica down my left leg and incredible pain in my lower back. I’m on my sixth week at home and now my right leg have started acting up as well. But like always my mood is on top and got all the time in world to look at inspiration on YouTube, Pinterest and Blogs. There’s not a lot to do when you’re lying down all day long. Today I wish to show you a card I made… well it’s been a month or so ago but that’s the way it can go. Anyway I saw a beautiful card (I don’t remember where) and I wanted to try one myself.


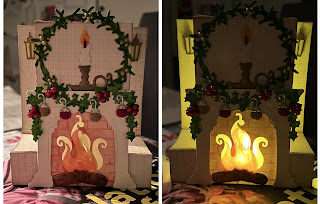
Jag är inne i en fas just nu där jag försöker använda oanvända dies/stämplar m.m. Jag har lätt för att handla men det är lite krigare att använda allt. Jag har så enormt mycket material jag aldrig har använt. Så det här kortet använde jag en massa av mina Magnolia Club dies (jul) och hade jätte kul. Vägglamporna på ”väggen” är en lyckt die från Wish som jag klippte ner. Som avslutning skapade jag två små stoppers och placerade att el-värmeljus stående på högkant I mitten av kortet. Jag hoppas att jag lyckas inspirera någon likt det kort jag blev inspirerad av. 

Right now I’m in a phase where I try to use unused dies and stamps etc. I so love to shop but I find it’s a little bit tricky to use it all. I have an enormous amount of craft supplies that I’ve never used. So for this card I’ve used a lot of my Magnolia Club dies (Christmas) and I hade a lot of fun making this card. The lamps on the “wall”, behind the fireplace, is a street lantern from Wish, but I cut away the stand-pole and the lanterns on the side and used the middle one as the “wall” lights. My finishing touches where to create two small stoppers and the place an electronic light standing on the side in the middle of the card. I hope I managed too inspire someone with my card the way I was inspired by the card I saw.


Pysselkramar, Lillian

Crafty hugs, Lillian